
< Return to Construction Index
Thought you might like to follow along as I make my prototype "Loungecaster"...
Ingredients (w/shipping):
(1) 24x14 8-ply Keller shell from www.aitwood.com
$133.75
From www.drummaker.com:
(16) "Tail Lite" lugs; screws & tension rods
(3) Floor tom legs & "classic type" brackets
(2) 2.3mm "Slingerland-style stick saver" 14in 8 hole chrome hoops
(1) "Deluxe" chrome vent grommet
(a few) misc. "experimental parts"
$147.47
(1) 24x54 White Diamond Pearl wrap from http://stores.ebay.com/bestdrumdeals
$54.95
TOTAL: $336.17 (+ a couple trips to the hardware store)
Remove shell from shipping box. Smell. Thump once or twice with heel of your palm, rap lightly with fingertip. Listen. Find corresponding notes on piano. Thump again. Listen. Rapture!
Trace shell on cardboard; square the circle. Divide each side by 2, connect the dots (for other than 8-lug, consult old highschool geometry notes).
Check with hoop.

Center shell on template, mark lug spacing.

Read camera manual.
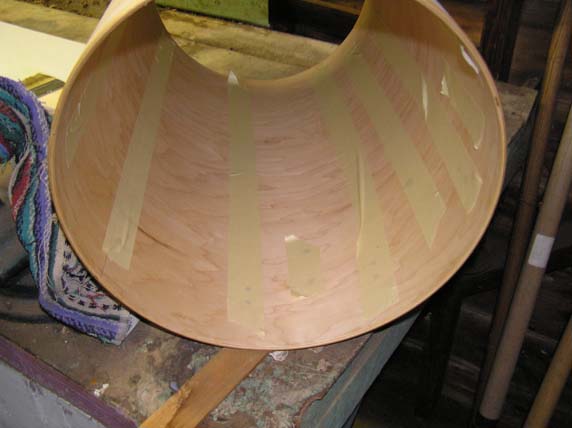
Using a T-square, continue tick mark the length of the drum. Apply (1) yard of masking tape to a wall or door. Using straightedge or long level, draw a line on tape strip. Line up tape with the line on the shell.

Using ruler and tailor's tape, check measurements. Run another length of tape along inside of drum to prevent splintering when drilling.

Repeat for all lugs. Using ruler and tailor's tape, check measurements. Check measurements again, using ruler and tailor's tape, from the other direction. Find discrepancies. Discover new and exotic interjections in your native tongue. Check measurements. Lay a head on the bearing edge. Lay hoop on head. Insert tension rods and screw into lugs to half useable thread length or so. Insuring that the lug mounting-posts are cool, by pressing the posts into the tape, check measurements.

Repeat for all lugs.

Using a ruler, tape measure, tailor's tape, T-square, calipers and eyes, check measurements. Deep, cleansing breaths. Check measurements. Using a brad-point drill bit, drill holes. Remind self that this is a "handcrafted" drum. A "custom" drum. And, if neccessary, "my" drum so just freakin' sue me if I have to do a little "handcrafting"!

Repeat for all holes, checking measurements with ruler, tape measure, tailor's tape, T-square, calipers, eyes, and ACTUAL LUGS HANGING FROM THE FREAKING RIM if neccessary. Attach hardware.

Assemble drum, even though you had to add washers to the GOD DAMN lugs and leg brackets which are still kinda loose sonuvabitch that wrap better make up for that 16th of a freaking inch, but BY GOD you WILL hear this beauty SING TONIGHT!

Tune. Listen. Rapture!
[CONTINUED...]
Rub tung oil into inside of shell. Wax bearing edges. Lay wrap inside up against a straight wall, fixed straight edge, etc. and brush on contact cement (I used Dap Weldwood, red label).

Tape shell holes.
Brush contact cement onto shell.

Align shell with straight edge and lay on wrap. Roll shell on wrap, pressing the wrap firmly onto the shell. Finish seam with acetone one small section at a time.

Clamp seam, re-drill holes from inside of drum, attach hardware.

Assemble drum.

...Rapture!