

< Return to Construction Index
The DW 5000 Delta pedal. This is my second (newer) DW pedal. Im going to take you step by step with pics as I change it to be used with a cocktail drum.
I had used light grease, locktite, paper towels, a drum key and an allen wrench to take this apart. The drum key and the allen wrench are included when you buy the pedal, so make certain you dont loose these tools (like I did with my newer pedal). The grease and locktite can be bought cheap at any hardware store. Just make certain you get light grease to lubricate the pedal instead of WD-40. WD-40 is a de-greaser and you will constantly need to keep spraying it every few gigs to keep it working smoothly. Light grease will hold up well to regular gigging as long as you re-grease the pedal once every year or so. Lets begin
First, there are two small set screws on each side of each of the black metal posts. You need to remove all 4 of these, make sure you take your time and be careful not to strip them. You can see the screws being removed in the pics with the allen wrench.

Take the spring off this black metal piece (which I call the cap). The cap has a set screw in the top. Loosen it with the allen wrench and carefully slide the cap off. It is a very tight fit, but try not to wiggle it. You wouldnt want to stress or wear any parts.
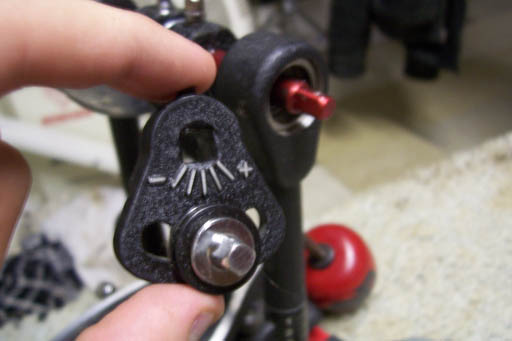
The cam and beater clamp are held on the axle with two drum key screws. Here is were you need to pay attention to how they went on if you want to put your pedal back the way it was.

Once the above mentioned parts are free from the axle you can (very carefully) slide the axle left away from the cap. A small bushing that surrounds the bearings will fall out of the left side of the pedal. Its held in pic number 06 so you know what to look for.

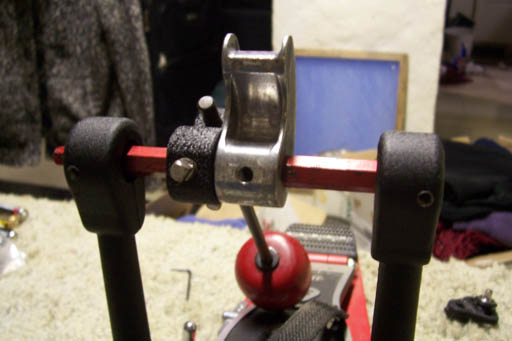
Youll then want to flip the cam backwards and the beater clamp needs to be turned upside down on the axle. Before tightening the cam, look straight down over the pedal to make sure the cam is properly aligned with the end of the footboard like in the pic above.

Re-assemble the pedal by putting in the set screws in the posts first before putting the cap on. When Putting the components back together always re-grease the moving parts. Check out the cap, you want a small gap between the nut on the backside and the post so it doesnt scrape or squeak.


Make certain you run the chain or strap around the side of the cam closest to you then attach it to the end away from you. Push on it some to make certain you have no squeaks before going to the next step.
If you plan on leaving the pedal like this indefinitely, I would recommend using locktite to keep the set screws tight. Set screws can be fragile and regular tightening can strip them. Locktite will help hold them in place for long periods of time.